DICOM images in Python: An overview
A key step towards the application of Deep Learning to medical images is the understanding of Digital Imaging and Communications in Medicine (DICOM) which represents the standard for the communication and management of medical imaging.
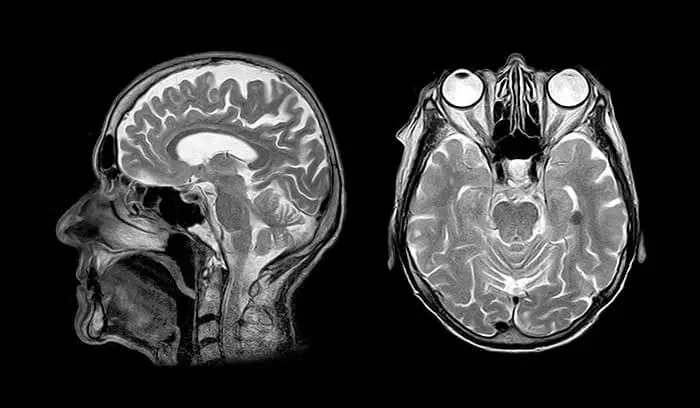 Image credit: Giovanni Pecoraro
Introduction
DICOM or Digital Imaging and Communications in medicine are image files sourced from different modalities, e.g., CT or MRI scans, and based on an international standard to transmit, store, retrieve, print, process, and display medical imaging information. DICOM files do not only contain the image, but also additional data, such as the patient identifier, date of birth, age, sex, and any other useful information about the diagnosis. Obviousely, DICOM files cannot be viewed as normal photos, so several DICOM viewers are available online (a list is available here), but, as always, Python can be very powerful in case additional processing is needed.
Pre-requisites
First, the following libraries are required:
- Pydicom: DICOM files reading and decoding library
- Numpy: Array manipulation library
- Pillow: Image processing library
- Matplotlib: Image visualization library
and can be easily installed via the command:
pip install pydicom numpy pillow matplotlib
Data structure
Once the Python environment is ready and a DICOM file is available, it can be read via the dcmread() method.
from pydicom import dcmread

DICOM_PATH = '/home/user/Desktop/exam/MD44PKO2/T2T5OLJX/I7600000'
ds = dcmread(DICOM_PATH)
type(ds)
pydicom.dataset.FileDataset
This method returns a FileDataset instance, which in turn represents an extension of Dataset class. It makes reading and writing to file easier and wraps a dictionary of DataElement. A DataElement is then composed of the following parts:
- a
tagthat identifies the attribute, usually in the format (XXXX,XXXX) with hexadecimal numbers, and may be divided further into DICOM Group Number and DICOM Element Number; - a
Value Representation (VR)that describes the data type and format of the attribute value. - a
Value Multiplicity (VM)that is automatically determined from the contents of the value. - a
valuewhich can be one of:- a regular numeric, string or text value as an int, float, str, bytes, etc
- a list of regular values (if
VM>1) - a
Sequenceinstance, where aSequenceis a list ofDatasetinstances, where each Dataset contains DataElement instances, and so on…
You can display the entire dataset by simply printing its string (str or repr) value:
print(ds)
Dataset.file_meta -------------------------------
(0002, 0000) File Meta Information Group Length  UL: 168
(0002, 0001) File Meta Information Version       OB: b'\x00\x01'
(0002, 0002) Media Storage SOP Class UID         UI: CT Image Storage
(0002, 0003) Media Storage SOP Instance UID      UI: 1.3.12.2.1107.5.1.4.55050.30000022121515300815600002074
(0002, 0010) Transfer Syntax UID                 UI: Explicit VR Little Endian
(0002, 0012) Implementation Class UID            UI: 1.2.840.113704.7.0.2
-------------------------------------------------
(0008, 0008) Image Type                          CS: ['DERIVED', 'SECONDARY', 'OTHER', 'CSA MPR', 'CSAPARALLEL', 'AXIAL', 'CT_SOM5 SEQ']
(0008, 0016) SOP Class UID                       UI: CT Image Storage
(0008, 0018) SOP Instance UID                    UI: 1.3.12.2.1107.5.1.4.55050.30000022121515300815600002074
(0008, 0020) Study Date                          DA: '20221215'
(0008, 0021) Series Date                         DA: '20221215'
(0008, 0022) Acquisition Date                    DA: '20221215'
(0008, 0023) Content Date                        DA: '20221215'
(0008, 0030) Study Time                          TM: '162614'
(0008, 0031) Series Time                         TM: '163202'
(0008, 0032) Acquisition Time                    TM: '162821.901196'
(0008, 0033) Content Time                        TM: '163202.921000'
(0008, 0050) Accession Number                    SH: '5895682501'
(0008, 0060) Modality                            CS: 'CT'
(0008, 0061) Modalities in Study                 CS: ['CT', 'SR']
(0008, 0070) Manufacturer                        LO: 'SIEMENS'
(0008, 0080) Institution Name                    LO: 'XXXXXXXXXX'
(0008, 0081) Institution Address                 ST: 'XXXXXXXXXX'
(0008, 0090) Referring Physician's Name          PN: 'MEDICO^REFERTANTE'
(0008, 1010) Station Name                        SH: 'CT55050'
(0008, 1030) Study Description                   LO: 'TC CRANIO (CAPO)'
(0008, 1032)  Procedure Code Sequence  1 item(s) ----
   (0008, 0100) Code Value                          SH: 'RS0932'
   (0008, 0104) Code Meaning                        LO: 'TC CRANIO (CAPO)'
   ---------
(0008, 103e) Series Description                  LO: 'ax ok'
(0008, 1048) Physician(s) of Record              PN: '10440^NEUROLOGIA'
(0008, 1070) Operators' Name                     PN: 'meduser'
(0008, 1080) Admitting Diagnoses Description     LO: '-'
(0008, 1090) Manufacturer's Model Name           LO: 'Sensation 64'
(0008, 1140)  Referenced Image Sequence  1 item(s) ----
   (0008, 1150) Referenced SOP Class UID            UI: CT Image Storage
   (0008, 1155) Referenced SOP Instance UID         UI: 1.3.12.2.1107.5.1.4.55050.30000022121515300815600001998
   ---------
(0008, 2111) Derivation Description              ST: 'MEDCOM RESAMPLED'
(0010, 0010) Patient's Name                      PN: 'ROSSI^MARIO'
(0010, 0020) Patient ID                          LO: '99999999'
(0010, 0021) Issuer of Patient ID                LO: 'X1V1_MPI'
(0010, 0030) Patient's Birth Date                DA: '19330101'
(0010, 0040) Patient's Sex                       CS: 'M'
(0010, 1010) Patient's Age                       AS: '090Y'
(0010, 1040) Patient's Address                   CS: 'XXXXXXXXXX'
(0018, 0015) Body Part Examined                  CS: 'HEAD'
(0018, 0050) Slice Thickness                     DS: '0.6'
(0018, 0060) KVP                                 DS: '120.0'
(0018, 1000) Device Serial Number                LO: '55050'
(0018, 1020) Software Versions                   LO: 'syngo CT 2014A'
(0018, 1030) Protocol Name                       LO: 'CBM_encefalo_SEQ'
(0018, 1110) Distance Source to Detector         DS: '1040.0'
(0018, 1111) Distance Source to Patient          DS: '570.0'
(0018, 1120) Gantry/Detector Tilt                DS: '0.0'
(0018, 1130) Table Height                        DS: '255.0'
(0018, 1140) Rotation Direction                  CS: 'CW'
(0018, 1160) Filter Type                         SH: '0'
(0018, 1170) Generator Power                     IS: '45'
(0018, 1190) Focal Spot(s)                       DS: '1.2'
(0018, 1200) Date of Last Calibration            DA: '20221215'
(0018, 1201) Time of Last Calibration            TM: '073319.000000'
(0018, 1210) Convolution Kernel                  SH: 'H10s'
(0018, 5100) Patient Position                    CS: 'HFS'
(0020, 000d) Study Instance UID                  UI: 1.2.840.113564.9.1.2015111110072131.20221209153953.25895682501
(0020, 000e) Series Instance UID                 UI: 1.3.12.2.1107.5.1.4.55050.30000022121515300815600001997
(0020, 0010) Study ID                            SH: 'CT20221215162611'
(0020, 0011) Series Number                       IS: '604'
(0020, 0012) Acquisition Number                  IS: None
(0020, 0013) Instance Number                     IS: '76'
(0020, 0032) Image Position (Patient)            DS: [-86.56525199874, -359.7734375, -75.906572657132]
(0020, 0037) Image Orientation (Patient)         DS: [0.97661555018595, 1.224606354e-016, -0.2149931792755, -1.19596961e-016, 1, 2.632820134e-017]
(0020, 0052) Frame of Reference UID              UI: 1.3.12.2.1107.5.1.4.55050.30000022121506293760900002193
(0020, 1040) Position Reference Indicator        LO: ''
(0020, 1208) Number of Study Related Instances   IS: '546'
(0020, 4000) Image Comments                      LT: ''
(0028, 0002) Samples per Pixel                   US: 1
(0028, 0004) Photometric Interpretation          CS: 'MONOCHROME2'
(0028, 0010) Rows                                US: 512
(0028, 0011) Columns                             US: 512
(0028, 0030) Pixel Spacing                       DS: [0.453125, 0.453125]
(0028, 0100) Bits Allocated                      US: 16
(0028, 0101) Bits Stored                         US: 12
(0028, 0102) High Bit                            US: 11
(0028, 0103) Pixel Representation                US: 0
(0028, 1050) Window Center                       DS: [35, 700]
(0028, 1051) Window Width                        DS: [80, 3200]
(0028, 1052) Rescale Intercept                   DS: '-1024.0'
(0028, 1053) Rescale Slope                       DS: '1.0'
(0028, 1054) Rescale Type                        LO: 'HU'
(0028, 1055) Window Center & Width Explanation   LO: ['WINDOW1', 'WINDOW2']
(0028, 2110) Lossy Image Compression             CS: '00'
(0032, 1032) Requesting Physician                PN: '10440^NEUROLOGIA'
(0032, 1060) Requested Procedure Description     LO: 'TC CRANIO (CAPO)'
(0032, 1064)  Requested Procedure Code Sequence  1 item(s) ----
   (0008, 0100) Code Value                          SH: 'RS0932'
   (0008, 0104) Code Meaning                        LO: 'TC CRANIO (CAPO)'
   ---------
(0040, 0275)  Request Attributes Sequence  1 item(s) ----
   (0040, 0007) Scheduled Procedure Step Descriptio LO: 'TC CRANIO (CAPO)'
   (0040, 0008)  Scheduled Protocol Code Sequence  1 item(s) ----
      (0008, 0100) Code Value                          SH: 'RS0932'
      (0008, 0102) Coding Scheme Designator            SH: 'DSS_MESA'
      (0008, 0104) Code Meaning                        LO: 'TC CRANIO (CAPO)'
      ---------
   (0040, 0009) Scheduled Procedure Step ID         SH: '5895682501'
   ---------
(0040, 1008) Confidentiality Code                LO: 'N'
(0088, 0200)  Icon Image Sequence  1 item(s) ----
   (0028, 0002) Samples per Pixel                   US: 1
   (0028, 0004) Photometric Interpretation          CS: 'MONOCHROME2'
   (0028, 0010) Rows                                US: 64
   (0028, 0011) Columns                             US: 64
   (0028, 0034) Pixel Aspect Ratio                  IS: [1, 1]
   (0028, 0100) Bits Allocated                      US: 8
   (0028, 0101) Bits Stored                         US: 8
   (0028, 0102) High Bit                            US: 7
   (0028, 0103) Pixel Representation                US: 0
   (7fe0, 0010) Pixel Data                          OB: Array of 4096 elements
   ---------
(6000, 0010) Overlay Rows                        US: 512
(6000, 0011) Overlay Columns                     US: 512
(6000, 0015) Number of Frames in Overlay         IS: '1'
(6000, 0022) Overlay Description                 LO: 'Siemens MedCom Object Graphics'
(6000, 0040) Overlay Type                        CS: 'G'
(6000, 0050) Overlay Origin                      SS: [1, 1]
(6000, 0051) Image Frame Origin                  US: 1
(6000, 0100) Overlay Bits Allocated              US: 1
(6000, 0102) Overlay Bit Position                US: 0
(6000, 3000) Overlay Data                        OW: Array of 32768 elements
(7fe0, 0010) Pixel Data                          OW: Array of 524288 elements
You can access specific elements by their DICOM keyword or tag number. When using the tag number, a DataElement instance is returned, so DataElement.value must be used to get the value.
NOTE: Some attributes values have been redacted or replaced with fake values for patient privacy.
ds.PatientName
'ROSSI^MARIO'
ds[0x10,0x10].value
'ROSSI^MARIO'
If you don’t remember or know the exact element tag or keyword, the Dataset class provides a handy dir() method, useful during interactive sessions at the Python prompt. It will return any non-private element keywords in the dataset that have the specified string anywhere in the keyword (case insensitive).
ds.dir('pat')
['DistanceSourceToPatient',
 'ImageOrientationPatient',
 'ImagePositionPatient',
 'IssuerOfPatientID',
 'PatientAddress',
 'PatientAge',
 'PatientBirthDate',
 'PatientID',
 'PatientName',
 'PatientPosition',
 'PatientSex']
Calling Dataset.dir() without passing it an argument will return a list of all non-private element keywords in the dataset:
ds.dir()
['AccessionNumber',
 'AcquisitionDate',
 'AcquisitionNumber',
 'AcquisitionTime',
 'AdmittingDiagnosesDescription',
 'BitsAllocated',
 'BitsStored',
 'BodyPartExamined',
 'Columns',
 'ConfidentialityCode',
 'ContentDate',
 'ContentTime',
 'ConvolutionKernel',
 'DateOfLastCalibration',
 'DerivationDescription',
 'DeviceSerialNumber',
 'DistanceSourceToDetector',
 'DistanceSourceToPatient',
 'FilterType',
 'FocalSpots',
 'FrameOfReferenceUID',
 'GantryDetectorTilt',
 'GeneratorPower',
 'HighBit',
 'IconImageSequence',
 'ImageComments',
 'ImageFrameOrigin',
 'ImageOrientationPatient',
 'ImagePositionPatient',
 'ImageType',
 'InstanceNumber',
 'InstitutionAddress',
 'InstitutionName',
 'IssuerOfPatientID',
 'KVP',
 'LossyImageCompression',
 'Manufacturer',
 'ManufacturerModelName',
 'ModalitiesInStudy',
 'Modality',
 'NumberOfFramesInOverlay',
 'NumberOfStudyRelatedInstances',
 'OperatorsName',
 'OverlayBitPosition',
 'OverlayBitsAllocated',
 'OverlayColumns',
 'OverlayData',
 'OverlayDescription',
 'OverlayOrigin',
 'OverlayRows',
 'OverlayType',
 'PatientAddress',
 'PatientAge',
 'PatientBirthDate',
 'PatientID',
 'PatientName',
 'PatientPosition',
 'PatientSex',
 'PhotometricInterpretation',
 'PhysiciansOfRecord',
 'PixelData',
 'PixelRepresentation',
 'PixelSpacing',
 'PositionReferenceIndicator',
 'ProcedureCodeSequence',
 'ProtocolName',
 'ReferencedImageSequence',
 'ReferringPhysicianName',
 'RequestAttributesSequence',
 'RequestedProcedureCodeSequence',
 'RequestedProcedureDescription',
 'RequestingPhysician',
 'RescaleIntercept',
 'RescaleSlope',
 'RescaleType',
 'RotationDirection',
 'Rows',
 'SOPClassUID',
 'SOPInstanceUID',
 'SamplesPerPixel',
 'SeriesDate',
 'SeriesDescription',
 'SeriesInstanceUID',
 'SeriesNumber',
 'SeriesTime',
 'SliceThickness',
 'SoftwareVersions',
 'StationName',
 'StudyDate',
 'StudyDescription',
 'StudyID',
 'StudyInstanceUID',
 'StudyTime',
 'TableHeight',
 'TimeOfLastCalibration',
 'WindowCenter',
 'WindowCenterWidthExplanation',
 'WindowWidth']
NOTE: You can also view DICOM files in a collapsible tree using the example program dcm_qt_tree.py.
Image visualization
DICOM images pixel data is stored as raw bytes in the DataElement associated to the PixelData tag. PixelData is often not immediately useful as data may be stored in a variety of different ways:
- The pixel values may be signed or unsigned integers, or floats
- There may be multiple image frames
- There may be multiple planes per frame (i.e., RGB) and the order of the pixels may be different
- The image data may be encoded using one of the available compression standards (1.2.840.10008.1.2.4.50 JPEG Baseline, 1.2.840.10008.1.2.5 RLE Lossless, etc). Encoded image data will also be encapsulated and each encapsulated image frame may be broken up into one or more fragments.
Because of the complexity in interpreting the pixel data, pydicom provides an easy way to get it in a convenient form: Dataset.pixel_array. As an example, if the pixel data is compressed then pixel_array will directly return the uncompressed data.
import matplotlib.pyplot as plt

arr = ds.pixel_array
plt.imshow(arr, cmap=plt.cm.bone)
<matplotlib.image.AxesImage at 0x7f5625845280>
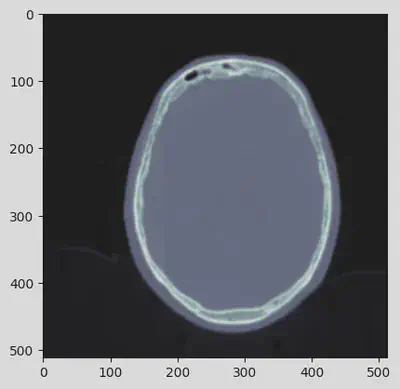
As it is possible to see, the picture details are not well-defined so the information content is quite poor. The following additional DICOM post-processing should be sequentially performed in order to enhance the image content.
1. Color Palette
Some DICOM datasets store their output image pixel values in a lookup table (LUT), where the values in Pixel Data are the index to a corresponding LUT entry. When a dataset’s (0028,0004) Photometric Interpretation value is PALETTE COLOR then the apply_color_lut() function can be used to apply a palette color LUT to the pixel data to produce an RGB image.
from pydicom.pixel_data_handlers.util import apply_color_lut

try:
    print(f"(0028,0004) Photometric Interpretation: {ds[0x28,0x4].value}")
    rgb = apply_color_lut(arr, ds)
    plt.imshow(rgb, cmap=plt.cm.bone)
except Exception as e:
    print(e)
(0028,0004) Photometric Interpretation: MONOCHROME2
No suitable Palette Color Lookup Table Module found
This was expected since the Photometric Interpretation is MONOCHROME2, so no suitable Palette Color Lookup Table Module could found and the apply_color_lut method fails.
2. Modality LUT or Rescale Operation
The DICOM Modality LUT module converts raw pixel data values to a specific (possibly unitless) physical quantity, such as Hounsfield units for CT scan (as in this case). The apply_modality_lut() function can be used with an input array of raw values and a dataset containing a Modality LUT module to return the converted values. When a dataset requires multiple grayscale transformations, the Modality LUT transformation is always applied first.
from pydicom.pixel_data_handlers.util import apply_modality_lut

arr = ds.pixel_array
hu = apply_modality_lut(arr, ds)

plt.imshow(hu, cmap=plt.cm.bone)
<matplotlib.image.AxesImage at 0x7f5621d45d60>

The image has not visually changed, but the pixel values have been correctly transformed into Hounsfield units.
import numpy as np

np.min(arr), np.max(arr)
(0, 2335)
np.min(hu), np.max(hu)
(-1024.0, 1311.0)
3. VOI LUT or Windowing Operation
The DICOM VOI LUT module applies a VOI or windowing operation to input values. The apply_voi_lut() function can be used with an input array and a dataset containing a VOI LUT module to return values with applied VOI LUT or windowing. When a dataset contains multiple VOI or windowing views then a particular view can be returned by using the index keyword parameter. In this case the index 0 will be used.
When a dataset requires multiple grayscale transformations, then it’s assumed that the modality LUT or rescale operation has already been applied.
from pydicom.pixel_data_handlers.util import apply_voi_lut
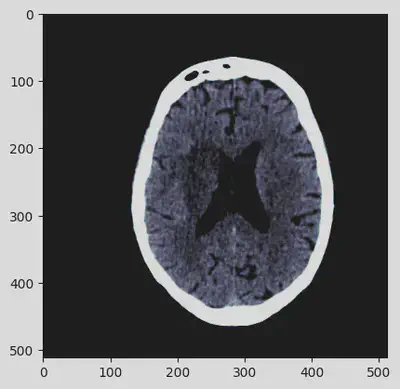
out = apply_voi_lut(hu, ds, index=0)
plt.imshow(out, cmap=plt.cm.bone)
<matplotlib.image.AxesImage at 0x7f5621ab8c40>

Got it! The sequence of pre-processing steps has deeply enhanced the details of the CT scan contained in the DICOM file. At this point, the image can be definitely visually analyzed.
Image export
As already discussed, DICOM files contain not only image data, but also lots of ancillary information. It has also been demonstrated the image may not be immediately usable without some processing. DICOM images are not accessible without specific viewers and the image exchange may be even more difficult since different viewers may differently process the images. A possible solution could be to convert the DICOM file into a standard exchange format, e.g., JPEG or PNG.
The starting point is the pre-processed image out. The first step is to convert pixel data to float in order to avoid overflow or underflow losses during image scaling.
new_image = out.astype(float)
Pixel data is currently expressed in Hounsfield units, but it must rescaled into the [0, 255] interval and then converted to 8 bits unsigned integer.
from PIL import Image

scaled_image = (np.maximum(new_image, 0) / new_image.max()) * 255.0
scaled_image = np.uint8(scaled_image)

final_image = Image.fromarray(scaled_image)
The image can then be easily saved in jpg or png format.
final_image.save('dicom.jpg')
final_image.save('dicom.png')
As a test, it is possible to import and plot the just saved jpg image.
img = np.asarray(Image.open('dicom.jpg'))
plt.imshow(img, cmap=plt.cm.bone)
<matplotlib.image.AxesImage at 0x7f5621a34cd0>
DICOM File-sets and DICOMDIR
A File-set is a collection of DICOM files that share a common naming space. Most people have probably interacted with a File-set without being aware of it; one place they’re frequently used is on the CDs/DVDs containing DICOM data that are given to a patient after a medical procedure (such as an MR or ultrasound). The specification for File-sets is given in Part 10 of the DICOM Standard.
Every File-set must contain a single file with the filename DICOMDIR, the location of which is dependent on the type of media used to store the File-set. For the most commonly used media (DVD, CD, USB, PC file system, etc), the DICOMDIR file will be in the root directory of the File-set. For other media types, Part 12 of the DICOM Standard specifies where the DICOMDIR must be located.
NOTE: Despite its name, a DICOMDIR file is not a file system directory and can be read using
dcmread()like any other DICOM dataset
DICOMDIR_PATH = '/home/user/Desktop/exam/DICOMDIR'
ds = dcmread(DICOMDIR_PATH)
type(ds)
pydicom.dicomdir.DicomDir
The most important element in a DICOMDIR is the (0004,1220) Directory Record Sequence: each item in the sequence is a directory record, and one or more records are used to briefly describe an available item, i.e., the so called SOP Instance, and its location within the File-set’s directory structure. Each record has a record type given by the (0004,1430) Directory Record Type element, and different records are related to each other using the hierarchy given in Table F.4-1. As examples, it is possible to go through some directory records:
print(ds.DirectoryRecordSequence[0])
(0004, 1400) Offset of the Next Directory Record UL: 0
(0004, 1410) Record In-use Flag                  US: 65535
(0004, 1420) Offset of Referenced Lower-Level Di UL: 500
(0004, 1430) Directory Record Type               CS: 'PATIENT'
(0010, 0010) Patient's Name                      PN: 'ROSSI^MARIO'
(0010, 0020) Patient ID                          LO: '99999999'
(0010, 0021) Issuer of Patient ID                LO: 'X1V1_MPI'
(0010, 0030) Patient's Birth Date                DA: '19330101'
(0010, 0040) Patient's Sex                       CS: 'M'
This is a PATIENT record which provides details about the patient, such as Patient’s Name and Patient ID (refer to Table F.5-1).
print(ds.DirectoryRecordSequence[1])
(0004, 1400) Offset of the Next Directory Record UL: 0
(0004, 1410) Record In-use Flag                  US: 65535
(0004, 1420) Offset of Referenced Lower-Level Di UL: 956
(0004, 1430) Directory Record Type               CS: 'STUDY'
(0008, 0020) Study Date                          DA: '20221215'
(0008, 0030) Study Time                          TM: '162614'
(0008, 0050) Accession Number                    SH: '5895682501'
(0008, 0061) Modalities in Study                 CS: 'CT'
(0008, 0090) Referring Physician's Name          PN: 'MEDICO^REFERTANTE'
(0008, 1030) Study Description                   LO: 'TC CRANIO (CAPO)'
(0020, 000d) Study Instance UID                  UI: 1.2.840.113564.9.1.2015111110072131.20221209153953.25895682501
(0020, 0010) Study ID                            SH: 'CT20221215162611'
(0020, 1206) Number of Study Related Series      IS: '5'
(0020, 1208) Number of Study Related Instances   IS: '545'
(07a1, 0010) Private Creator                     LO: 'ELSCINT1'
(07a1, 1040) [Tamar Study Body Part]             CS: 'ABDOMEN'
(07a3, 0010) Private Creator                     LO: 'ELSCINT1'
(07a3, 1069) Private tag data                    OB: Array of 98 elements
This is a STUDY record, where details such as acquisition date, time and description are included (refer to Table F.5-2).
print(ds.DirectoryRecordSequence[2])
(0004, 1400) Offset of the Next Directory Record UL: 6032
(0004, 1410) Record In-use Flag                  US: 65535
(0004, 1420) Offset of Referenced Lower-Level Di UL: 1214
(0004, 1430) Directory Record Type               CS: 'SERIES'
(0008, 0021) Series Date                         DA: '20221215'
(0008, 0031) Series Time                         TM: '162644'
(0008, 0060) Modality                            CS: 'CT'
(0008, 103e) Series Description                  LO: 'Topogram  0.6  T20s'
(0018, 0015) Body Part Examined                  CS: 'ABDOMEN'
(0018, 1030) Protocol Name                       LO: 'CBM_encefalo_SEQ'
(0020, 000e) Series Instance UID                 UI: 1.3.12.2.1107.5.1.4.55050.30000022121508001632800000005
(0020, 0011) Series Number                       IS: '1'
(0020, 1209) Number of Series Related Instances  IS: '1'
The SERIES record adds details about the acquisition modality, i.e., CT, and the examined body part, i.e., ABDOMEN (refer to Table F.5-3).
print(ds.DirectoryRecordSequence[3])
(0004, 1400) Offset of the Next Directory Record UL: 0
(0004, 1410) Record In-use Flag                  US: 65535
(0004, 1420) Offset of Referenced Lower-Level Di UL: 0
(0004, 1430) Directory Record Type               CS: 'IMAGE'
(0004, 1500) Referenced File ID                  CS: ['MD44PKO2', 'OBGUOM0I', 'I1000000']
(0004, 1510) Referenced SOP Class UID in File    UI: CT Image Storage
(0004, 1511) Referenced SOP Instance UID in File UI: 1.3.12.2.1107.5.1.4.55050.30000022121506293760900002194
(0004, 1512) Referenced Transfer Syntax UID in F UI: Explicit VR Little Endian
(0008, 0008) Image Type                          CS: ['ORIGINAL', 'PRIMARY', 'LOCALIZER', 'CT_SOM5 TOP']
(0008, 0016) SOP Class UID                       UI: CT Image Storage
(0008, 0018) SOP Instance UID                    UI: 1.3.12.2.1107.5.1.4.55050.30000022121506293760900002194
(0008, 0023) Content Date                        DA: '20221215'
(0008, 0033) Content Time                        TM: '162704.453698'
(0008, 0060) Modality                            CS: 'CT'
(0018, 0010) Contrast/Bolus Agent                LO: ''
(0020, 0013) Instance Number                     IS: '1'
(0020, 0052) Frame of Reference UID              UI: 1.3.12.2.1107.5.1.4.55050.30000022121506293760900002193
(0020, 1041) Slice Location                      DS: '-14.5'
(0028, 0002) Samples per Pixel                   US: 1
(0028, 0004) Photometric Interpretation          CS: 'MONOCHROME2'
(0028, 0010) Rows                                US: 512
(0028, 0011) Columns                             US: 512
(0028, 0100) Bits Allocated                      US: 16
(0088, 0200)  Icon Image Sequence  1 item(s) ----
   (0028, 0002) Samples per Pixel                   US: 1
   (0028, 0004) Photometric Interpretation          CS: 'MONOCHROME2'
   (0028, 0010) Rows                                US: 64
   (0028, 0011) Columns                             US: 64
   (0028, 0034) Pixel Aspect Ratio                  IS: [1, 1]
   (0028, 0100) Bits Allocated                      US: 8
   (0028, 0101) Bits Stored                         US: 8
   (0028, 0102) High Bit                            US: 7
   (0028, 0103) Pixel Representation                US: 0
   (7fe0, 0010) Pixel Data                          OB: Array of 4096 elements
   ---------
(00e1, 0010) Private Creator                     LO: 'ELSCINT1'
(00e1, 1040) [Image Label]                       SH: ''
Last but not least, the IMAGE record contains all the image data, i.e., Pixel Data, and metadata, e.g., Bits Allocated, Photometric Interpretation.
While it’s possible to access everything within a File-set using the DICOMDIR dataset, making changes to an existing File-set quickly becomes complicated due to the need to add and remove directory records, recalculate the byte offsets for existing records and manage the corresponding file system changes. A more user-friendly way to interact with one is via the FileSet class.
from pydicom.fileset import FileSet

fs = FileSet(ds)
type(fs)
pydicom.fileset.FileSet
An overview of the File-set’s contents is shown when printing:
print(fs)
DICOM File-set
  Root directory: /home/user/Desktop/exam
  File-set ID: (no value available)
  File-set UID: 1.2.840.113704.7.1.0.12118132138452.1672763590.1000003
  Descriptor file ID: (no value available)
  Descriptor file character set: (no value available)
  Changes staged for write(): DICOMDIR update, directory structure update

  Managed instances:
    PATIENT: PatientID='99999999', PatientName='ROSSI^MARIO'
      STUDY: StudyDate=20221215, StudyTime=162614, StudyDescription='TC CRANIO (CAPO)'
        SERIES: Modality=CT, SeriesNumber=1
          IMAGE: 1 SOP Instance
        SERIES: Modality=CT, SeriesNumber=2
          IMAGE: 66 SOP Instances
        SERIES: Modality=CT, SeriesNumber=602
          IMAGE: 199 SOP Instances
        SERIES: Modality=CT, SeriesNumber=603
          IMAGE: 143 SOP Instances
        SERIES: Modality=CT, SeriesNumber=604
          IMAGE: 136 SOP Instances
which basically provides a brief summary of the directory records previously introduced.
Conclusions
This post has provided a wide overview of DICOM images in Python in particular about:
- DICOM data structure
- DICOM image visualization (and pre-processing)
- DICOM image export
- DICOM file-sets and DICOMDIR
As a summary, the following script summarizes all the introduced concepts since it allows to read a DICOMDIR file (via the DICOMDIR_PATH variable) and convert all the SOP instances to JPEG images. The exported images will be saved to a specific path based on specific metadata, i.e., {OUTPUT_PATH}/{patient_id}/{study_date}/{series_number}/{instance_number}.jpg.
import os
from PIL import Image
import numpy as np
from pydicom import dcmread
from pydicom.fileset import FileSet
from pydicom.pixel_data_handlers.util import apply_color_lut, apply_modality_lut, apply_voi_lut


DICOMDIR_PATH = '/home/user/Desktop/exam/DICOMDIR'
OUTPUT_PATH = '/home/user/Desktop/exam_converted'

# DICOMDIR reading
ds = dcmread(DICOMDIR_PATH)
fs = FileSet(ds)

# Iterating over the FileSet instances
for instance in fs:
    # Loading the corresponding SOP Instance dataset
    ds = instance.load()

    # Getting instance metadata to categorize images
    patient_id = ds.PatientID
    study_date = ds.StudyDate
    series_number = ds.SeriesNumber
    instance_number = ds.InstanceNumber

    # Getting instance pixel data
    arr = ds.pixel_array

    # Applying color palette (if available)
    try:
        arr = apply_color_lut(arr, ds)
    except Exception as e:
        pass

    # Applying modality LUT
    hu = apply_modality_lut(arr, ds)

    # Applying VOI LUT
    out = apply_voi_lut(hu, ds, index=0)

    # Rescaling pixel data
    new_image = out.astype(float)
    scaled_image = (np.maximum(new_image, 0) / new_image.max()) * 255.0
    scaled_image = np.uint8(scaled_image)
    final_image = Image.fromarray(scaled_image)

    # Exporting image in JPEG format
    IMAGE_PATH = f"{OUTPUT_PATH}{os.sep}{patient_id}{os.sep}{study_date}{os.sep}{series_number}"
    os.makedirs(IMAGE_PATH, exist_ok=True)
    OUTPUT_IMAGE = f"{IMAGE_PATH}{os.sep}{instance_number}.jpg"
    final_image.save(OUTPUT_IMAGE)
References
Giovanni Pecoraro
Senior Security Engineer
My research interests include space systems, cyber security, signal processing and artificial intelligence.